How to make status labels on monday.com in exactly one minute


Recent Posts:
monday.com updates for August 2022
Get the most of your monday.com system with our monthly updates, tips, and tricks. What a great month…
Three quick tips for better organization on monday.com
Here are three quick tips for getting better results with your monday.com boards. While some of these might…
CONNECT WITH US
Got a minute? That’s literally all it takes to understand how to make status labels on monday.com
The Status Column is really useful for a variety of functions on monday.com. Seriously, you use it pretty much everywhere. It’s why monday.com offers up to different status options for any label you use. The problem is that sometimes you need a whole bunch of them all at once, and it can be time-consuming to input or edit every status label you need individually. Nobody has time for that.

For example, maybe you want to get more visibility on which regions various tasks are taking place. As long as there are fewer than 40, a status column is a great option for this — and would provide an at-a-glance overview with easy to interpret colors. Suppose you already have a list of every region you work in. In that case, you can use the dropdown column’s rapid input method and then simply convert that dropdown to a status column — taking something that might take minutes and finishing it in seconds.
Are you the sort of person who likes to read instead of watching a video? No problem! Here’s exactly how to do this, but, you know, written down instead.
How to make status labels on monday.com in just three clicks
Ready? Set. Go.
Step 1: Create a dropdown column on your monday.com board
Go to your monday.com board. On the right-hand side, click the + sign. There you will find the option to create a dropdown column on your board. Do it! Seems easy, right? Like we said, we’re going to get you through this whole process in about three clicks.
Step 2: Create your list of labels in another word document/spreadsheet/etc
Use a spreadsheet, email, word doc. Honestly, whatever’s clever. Don’t think too long about it. Just make sure that the labels are accurate — you don’t want to spend time going back and editing later. The big thing here is that it has to be in a list form with ENTER pressed between each item. (You know, like how a list looks.)
Highlight the entire list, then right-click and choose “copy.”
Step 3: Copy/Paste your list into the dropdown menu on monday.com
Go to your dropdown menu on monday.com and paste your list into it. Your list should be automatically turned into individual dropdown labels. Scroll up and down to make sure that they’re correct.
Step 4: Convert the dropdown to a status column

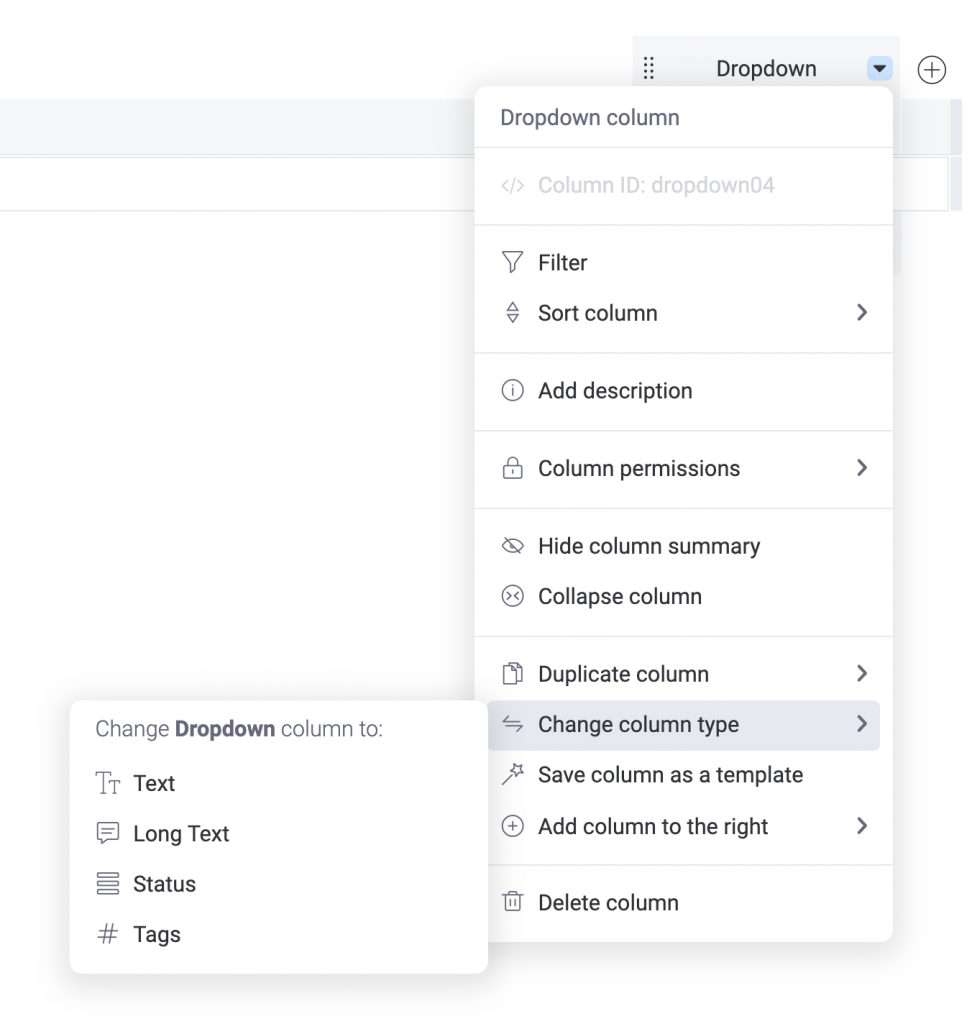
Go to the dropdown column’s options menu and “Change Column Type” to a status column.
Now you can sit back and admire your handiwork… now get back to work!
Now your employees can choose from your list of status labels. We used regions as an example, but there are nearly limitless ways to use this technique. That’s the beauty of monday.com; once you master some of these time savers, you’ll come to appreciate the flexibility and power it offers the folks who use it.
Share:

Have more monday.com questions?
We’re here for you.
Lucid Day grew out of a passion for making work operations spark - for the individual, the team, and the business as a whole. We drive change in our customer’s business by focusing on what will drive effective teamwork. We establish intuitive, simple, and robust workflows in monday.com within an effective structure to drive. And we believe monday.com can provide that unleashing energy.
As small and mid-sized business owners and loyalists, we’ve experienced first-hand the power of monday.com to revolutionize the way we do business and want other SMBs to experience it too. No matter the size of your organization or your budget, we will find a way to help you get all you can out of monday.com.


